Font Formatting Toolbar
To make your work a little easier, Ableword automatically shows a quick formatting toolbar. This includes some commonly used formatting features.
![]()
First you can choose your desired font & font size.
By clicking on:
B you can change the style to bold
I changes your style to italics
U adds single underlining
You can use any combination simply by clicking on the letter representing the style, and if you change your mind simply click on that style again to turn it off. If you have already typed the text you wish to format, highlight all the text you wish to format and then click on the style buttons you wish to use.
Ableword defaults to using ‘left justify’ – this user manual is all set to Left Align. It means you have a smooth edge on the left, a ragged edge to the right and all spaces between words are the same size.
The next choice is Right Align and this is the opposite of Left Align in that you have a smooth edge on the right of your text, a ragged edge to the left and all the spaces between words are the same size. Like this paragraph. It’s ideal for addresses at the top of letters.
The next choice is Centre. This is where Ableword aligns text in the centre of the page, giving a ragged edge to both the left and right. It’s a good look for invitations or poems and can really enhance your display. This paragraph has been Centred.
Finally there is the choice to Justify. This is where Ableword spreads your typing out, regardless of how long or short your words are, to give smooth edges both left and right sides. This looks very neat, at a glance, but can give you some odd results if you have some very long words within your text. If you use Justify it ’s a very good idea to scan through your document to check for odd looking text where perhaps you could restructure your sentence for a smoother look. This paragraph is Justified and you’ll notice that the final line does not get spread to fit both left and right sides.
Bullets
![]()
Clicking this icon will start each paragraph with a ‘bullet’. Make sure you’re on the line you want the bullets to start, then click this button. Ableword will start each new paragraph with a bullet that sits on your left hand margin with the text slightly indented:
This is how bulleted paragraphs look:
- Bullet 1
- Bullet 2
- Bullet 3
When your paragraph is more than one line long Ableword aligns the block of text nicely to the left, but slightly indented to un-bulleted text. When you press enter you start a new paragraph. If you want to break up your text without starting a newly bulleted paragraph then simply press and hold your Shift key whilst pressing Enter. Yyou can Shift+Enter as many times as you like for presentation purposes.
When you wish to stop putting bullets at the start of your text, press Enter to start a new line and then click on the Bullets icon again to turn it off. To use more advanced features of Bulleting paragraphs, click on the Format Menu and select Bullets and Numbering.
Numbering
![]()
Clicking this icon will start numbering your paragraphs. Make sure you’re on the line you want the numbering to start, then click this button. Ableword will start the numbering at 1, and increase with each new paragraph. The paragraph number sits on your left hand margin with the text slightly indented:
- Here I’m showing you how the numbering will look. When your paragraph is more than one line long you can see Ableword aligns the block of text nicely to the left, but slightly indented to un-numbered text.
- When you press Enter, you start a new paragraph. If you want to break up your text without starting a newly numbered paragraph then simply press and hold your Shift key whilst pressing enter
The result looks like this, although you can Shift+Enter as many times as you like for presentation purposes. - Above I have used Shift+Enter, then Enter, to space out the paragraphs.
When you wish to stop numbering your text, press Enter to start a new line and then click on the Numbering icon again to turn it off. If you want to number more text further on in your document Ableword will default to start numbering where you left off. To use more advanced features of Numbering paragraphs, click on the Format Menu and select Bullets and Numbering.
Tab Stops
![]()
Ableword has already inserted tab-stops every 2cm, set to align your text to the right. To use these existing tabs, simply press your tab button until you reach the stop you want to use.
It’s easy to add new tab stops from the shortcut menu. Make sure your cursor is on the line that you wish to use then click on the tab stop button to pick the type of tab stop you wish to use. You have the choice of:
![]() Align text to the right
Align text to the right
![]() Align text to the left
Align text to the left
![]() Centre text at this point
Centre text at this point
![]() Decimal – this centres numbers from the decimal point
Decimal – this centres numbers from the decimal point
![]() Align to the right margin (the right-most tab)
Align to the right margin (the right-most tab)
When you’ve chosen which tab stop you want to use, click on the ruler where you want the tab stop to be:
![]()
To use the tab stop, simply click on your tab stop button to get there and start typing. If you want to remove the existing tab stops, you need to go to the Format Menu and select TABS.
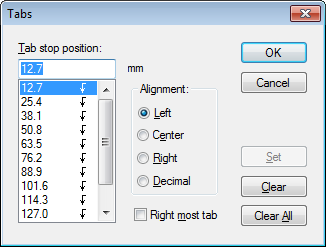
This will bring up a dialogue box where you can see Ableword’s default tab stops in the list. Click on the tab stop you wish to remove then click on Clear. If you want to remove all the tab stops, simply click on Clear All. You can also add new tab stops or amend the existing ones from this menu.
To amend an existing tab stop, click on the item in the list that you wish to change then you can amend the alignment. When you have finished amending, click on OK and the changes will show in your ruler.
To add a new tab stop, click into the top box and type where you want the tab stop to be, eg 150 = 150mm to the right of the left-hand margin. Then select the radio button for how you want this tab stop to be aligned. When you’ve finished, click on OK and your new tabs will show in your ruler.