Main Toolbar Buttons
Description of functionality of buttons on main toolbar
![]()
![]() New File
New File
Click on this to create a blank new file. If you already have a file open
Ableword will close this file before creating the new blank one but will ask
you if you wish to save any changes first.
![]() Open File
Open File
Click on this to browse your files and folders. Once you have clicked
Ableword will open a search window. In the bottom right hand sector you can
see the types of document file Ableword will search for and open. These are:
.doc .docx .pdf .rtf .txt .htm .html
If you open a ‘PDF’, Ableword will automatically allow you to edit the file
(and then later save as a PDF again)
If you already have a file open, Ableword will close this file before opening your next selection, but will ask you if you wish to save any changes first.
![]() Save File
Save File
By clicking on this button you will save your file. If it’s the first time this file has been saved Ableword will prompt you to choose a location to store the file. Ableword will default to ‘my documents’ if you don’t choose a different location. You should name your file at this point, although Ableword will save the file as ‘untitled.doc’ unless you choose a different name or document type.
To name your document, click in the ‘file name’ box, and type the name you wish. At this point you can also change the file type by clicking in the ‘save as type’ box and selecting a different file type. Ableword defaults to ‘.doc’ as this is the most popular file type for a word processor.
If you have already saved your file, when you click on this button Ableword
will save the latest version of your file with the same name and location
you have already specified. (if you wish to give your file a different name,
or save it in a different location, see help files relating to the File
menu)
It’s a good idea to save your file often – you don’t want to lose any work
if you have a power cut or your laptop runs out of battery!
![]() Print
Print
This button will bring up the printer dialogue box showing your default
printer. At this point, if you have more than one printer, you can change
the printer. You can also change the print properties (such as colour or
black & white, single or double-sided, depending on the features your
printer offers.)
To change the printer click on the dropdown arrow just to the right of your
printer name. You will then have a list of all your printers to choose from.
To change the properties click on the Properties button. Here you will have
any properties that are relevant to your printer. Remember these features
are not part of Ableword, they are dependent on your printer.
You can change the number of copies you wish to print by either overtyping
the number 1 in the ‘number of copies’ box or by using the up and down
arrows to the side.
You can select which pages to print if you document contains more than one.
Do this by clicking on the ‘Pages’ radio button. This will enable the ‘from’
and ‘to’ boxes. Click in each box to tell your printer which pages you wish
to print. For example, if you have a 10-page document but only want to print
pages 2, 3 and 4, you would enter 2 in the ‘from’ box and 4 in the ‘to’ box.
![]() Print Preview
Print Preview
Clicking on this button provides you with a preview of your document when
it’s printed. It will bring this preview up in a separate window which you
can resize as you wish, or maximise. You cannot amend the document in this
window.
In the print preview window, you can view one or more pages at a time by
clicking on the page view buttons at the top. You can also click on the
printer icon to bring up the printer dialogue box (see Print for more
details) When you have finished with the print preview, click on ‘close’ and
Ableword will return you to your document so you can save or continue to
edit it.
![]() Page Setup
Page Setup
Clicking on this button brings up a window showing all the different options
to set your page up how you wish. It has 4 different tabs to choose from. -
See Page Setup for more information.
![]() Cut
Cut
This function allows you to chop out a segment of your file so you can move
it around in the document. Simply highlight all the text (including pictures
and tables) you want to move then click on the icon. This text is then
removed from the document and stored on a virtual clipboard ready for you
to reinsert it somewhere else (see Paste) The virtual clipboard is emptied
when you close Ableword and can only hold one segment of text, so make sure
you reinsert this before you cut (or copy) another segment out or close the
program!
![]() Copy
Copy
This function allows you to copy a segment of your file so you can use it
somewhere else in your document or in another document. Simply highlight
all the text (including pictures and tables) you want to copy then click on
the icon. This text is then copied from the document and stored on a virtual
clipboard ready for you to duplicate somewhere else (see Paste) The virtual
clipboard is emptied when you close Ableword and can only hold one segment
of text at a time, so make sure you insert this text before you cut or copy
another segment from your document or close the program.
![]() Paste
Paste
This function is used after Cut or Copy. When you have Cut or Copied text
from a document it gets stored on a virtual clipboard. The Paste function
allows you to put this text back into an Ableword document in any location.
Simply put your cursor where you would like the text to reappear and then
click this icon. You can paste the same text as many times as you like,
until you have either Cut or Copied different text, or closed Ableword.
![]() Undo
Undo
This function allows you to undo more than your last 30 actions, just in
case you change your mind! It will undo one action at a time in reverse
order. For example, if you typed a sentence and then underlined it that
would be 2 actions. The first ‘undo’ would take the underline off, the
second would delete the typed sentence. Simply click this icon and your
action is undone! Click again and the preceding action is undone. Keep going
until you’re satisfied you’ve undone all you wish to.
![]() Redo
Redo
This function allows you to immediately ‘redo’ any actions you have ‘undone’
using the Undo feature. It is only active immediately after using Undo and
will redo as many items as you have ‘undone’. Simply click this icon.
![]() Font Properties
Font Properties
Clicking this icon will bring up a window showing you lots of choices you can make to personalise the font you are using. There are a list of different fonts installed for you to choose from. The window will show which font you are currently using and to change this, simply use the slider to the right of the listed fonts. You can also increase or decrease the size the text appears by using the ‘Size’ slider to the right of the numbers.
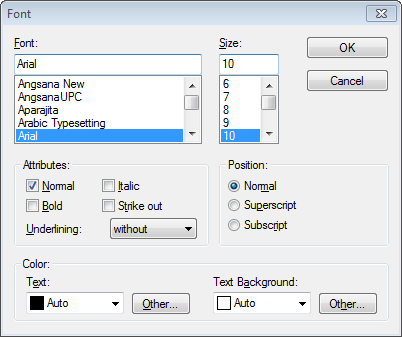
The Attributes section is where you can change the style to bold, italics or
use strike out and add underlining. Simply click in the check box to the
left of the attribute you wish to use – you can use any combination! If you
wish to underline your text, click on the dropdown arrow and choose from
'without', 'single', 'double' or 'words only' where the spaces and characters (such
as commas) between the words are not underlined.
The Position section allows you to have superscript or subscript simply by
clicking on the desired radio button. There’s no need to change the size of
your font to a smaller one when using this feature, Ableword will reduce the
font automatically!
The Colour section allows you to change the colour of your text by clicking
the dropdown arrow and selecting which colour you want. If the colour you
desire isn’t showing in the list, click on the ‘Other’ button and then you
can custom make a colour that suits you. This section also allows you to
highlight text by changing the background colour, for example, to red to
make that text stand out more. Again, you do this by clicking the dropdown
arrow and selecting which colour you want, or using the ‘Other’ button to
custom make a colour that suits you.
![]() Document information
Document information
When you click on this icon it will bring up a window showing some
statistics on your document – ideal if you need to meet a word target or
document size! This shows the word count, number of pages, number of
characters, paragraphs and lines. When you’ve finished reading your
statistics simply click OK and the window will close.
![]() Find
Find
This feature allows you to find a specific string of characters such a part
of a word, a whole word or a few words that show together. Simply click the
icon, type in the ‘Find What’ box the characters you’re looking for and then
click on ‘Find Next’. Ableword will default to match the case you have
typed, and to search from where your cursor is down through the document.
You can simply click and remove the tick from the Match Case box or click
the radio button to change the direction. If Ableword cannot find the
characters you are looking for it will simply say the end of the document
has been reached. If it can find what you’re looking for it will highlight
that text and show you where it is. When you have finished using this
feature simply click the ‘cancel’ button and the search window will close.
![]() Spelling
Spelling
By clicking this button Ableword will check the spelling in your document
against its default dictionary (US English, with more dictionaries coming
soon) and will highlight any words not showing in the dictionary for you to
accept or correct. At this point you can add words to the dictionary, for
example names, simply by clicking the Add to Dictionary button. You can also
ignore errors, either once (and then Ableword will continue to show you this
error if it appears later in the document) or all occasions in this
document. If Ableword can, it will make suggestions for correcting the
error. You can then ask Ableword to change just this occurrence of the error
(by selecting the correct word and then clicking on the Change button) or
all the occurrences (again, by selecting the correct word but then click on
the Change All button) If Ableword can’t find a suitable suggestion, you
need to close the Spelling window and correct the word yourself.
You can change the dictionary Ableword is using by clicking the dropdown
arrow next to the Suggestions Dictionary showing.
Remember, a spelling checker will only flag errors where you have typed a
word that it doesn’t think exists. It’s always worth proof-reading your
document to make sure you haven’t any other errors!
![]() Show/Hide Formatting Characters
Show/Hide Formatting Characters
By clicking this icon Ableword will show you little symbols to represent
things such as spaces, returns and page breaks. This can be handy to use,
for example when you want to see if you inserted a page break or if Ableword
is automatically breaking the page at that point. Click the icon again to
hide these symbols.
![]() Insert Image
Insert Image
When you click this icon Ableword will open a search box so you can find
any image you wish to insert. You can change the file type you are looking
for by clicking in the dropdown box on in the bottom right hand side.
Ableword defaults to Windows Bitmap (.bmp) but will also support:
Tagged Image Format (.tif)
Windows Metafile (.wmf)
Portable Network Graphic (.png)
JPEG File Interchange Format (.jpg)
Graphics Interchange Format (.gif)
Windows Enhanced Metafile (.emf)
When you have found your file, click on OK and Ableword will insert your
picture into your document. If you wish to change the size of the picture in
your document simply click on the picture itself. In each corner, and
halfway down each side, little boxes will appear. Click into one of the
boxes and hold your mouse button down, then drag that box until the picture
is the size you want. When you have finished, simply let go of your mouse
button and then click somewhere away from the picture.
![]() Insert Text Frame
Insert Text Frame
To use this feature, make sure your cursor is at the end of a line or at the start of a fresh line. Then click the icon and Ableword will insert an empty box into your document where your cursor currently is.
Click into this box to fill it with text, or even a picture. If you want to change the size of your text box, hover over the edge of it with your mouse. Your cursor will then change shape to a four headed arrow> then click on the edge of your text box. In each corner, and halfway down each side, little boxes will appear. Click into one of the boxes and hold your mouse button down then drag until the text box is the size you want. When you have finished, simply let go of your mouse button and then click somewhere away from the box. You can also use these little markers to move the text box around your document – it can go anywhere!
Anything you’ve inserted into the text box will move too. If you insert a picture into a text box, you might need to change the size of the picture to make it fit nicely. To do this simply click on the picture itself. In each corner, and halfway down each side, little boxes will appear. Click into one of the boxes and hold your mouse button down, then drag that box until the picture is the size you want. When you have finished, simply let go of your mouse button and then click somewhere away from the picture.
![]() Insert Table
Insert Table
Clicking this icon brings up a new small window. If you want to insert a
table, make sure your cursor is where you want the table to appear before
clicking on this icon. This makes things easier later on (although you can
easily use the Cut and Paste icons to move the table if you wish). Once
you’ve clicked on this icon you first need to decide on your table size by
selecting the number of columns and the number of rows. Ableword defaults to
5 columns, 4 rows and to change these simply click on the arrows to the
right of the numbers. Alternately, click into the boxes showing the number
of columns/rows and simply type the number you require.
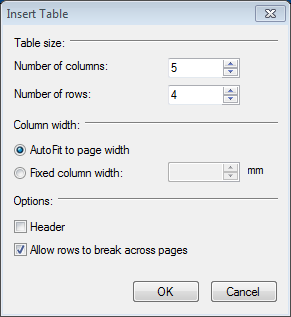
Ableword defaults to automatically sizing your table to fit the page width,
regardless of the number of columns. If you increase the number of columns,
each column will be smaller. If you decrease the number of columns, each
column will become larger. You can also tell Ableword to fix the column
width by clicking the radio button for ‘Fixed Column Width’. Once you have
clicked here Ableword will activate the box where you can specify how wide
you want each column to be. Simply use the up and down arrows or alternately
click into the box showing the column width number and type in the value you
require. However, once you have inserted the table, you can change the
column sizes. Hover your cursor over the column edge you wish to move and
your cursor will change shape to a double headed ‘move’ cursor. At this
point click and hold your mouse button then drag the column edge to where
you want it to be. This is very handy for resizing columns after you have
entered your table contents.
By clicking into the Header box, Ableword will repeat the top row of your
table if it’s so large it goes onto more than one page. By putting the tick
in here, when your table goes onto the next page, you will see a new row
appear with your header text already completed.
Ableword allows you to make sure your table is not split by a natural page
break. Simply click into the box ‘Allow rows to break across pages’ and
remove the tick.
Click on OK when you are finished, the window will close and your table will
be inserted where your cursor was. Now simply click into the cell you want
to start typing in and off you go. Within each cell, if you press Enter you
will stay within that cell, but if you click Tab you will move to the next
cell. You can format the contents of your table in the same way as the rest
of your document. You can even insert another table into one of the cells of
your table!